Install Custom Fonts in Windows 11: Do you want to install custom fonts in Windows 11? Audio looking for the best ways to install custom fonts in Windows 11? If your answer is yes then you are in the perfect place. Hear this tutorial we provide two different methods to install custom fonts in Windows 11.
Mostly, you can personalize your PC by changing themes and wallpapers. these two most common tweaks uses are generally preferred. Some people, like to change the default Windows 11 for their needs. Yes, only from the customization point, changing custom fonts helps in designing some project work and changing the old text styles.
In that way, there are several reasons to change custom fonts in Windows 11. There are different methods available in the internet market to install custom fonts. Here we provide, the very easiest method to install custom fonts in Windows 11. Follow along for the instructions that help to change your font style with the help of custom fonts.
Read Also: ES File Explorer for PC, Chromecast for PC
Here we also provide the best methods to install custom fonts in Windows 11 that help to customize your text settings and get information about uninstalling custom fonts on your Windows. So keep reading this complete tutorial and you will get more information about custom fonts and their features in your Windows 11.
Best methods to add custom font in Windows 11:
There are different methods available in the internet market that help to add custom fonts in Windows 11. So it is a very difficult task to find the best method. That’s why we’re here providing two different methods helps to add custom fonts in Windows 11.
These two methods have their own set of perks and caveats. Without any hesitate using this method to add your custom fonts in Windows 11.
Microsoft store:
It is the most popular and safest way to add custom fonts to your windows. The Microsoft store has two-fold. The first half is, you could be assured the file authority.
Remember that, you would not have to be looking searching for the perfect choice of third-party site for offering custom fonts in your Windows. Microsoft Store is the best and trustful resource for adding custom fonts. That’s why we recommend this method.
There are different online sites providing amazing features and different types of custom styles. But it is very risky to add it to your Windows. It may have a virus. So please avoid third-party online sites. The Microsoft store has only a restricted number of custom styles.
- Open your computer Just click the start menu and search the Microsoft store.
- You can see it search about the present at the top.
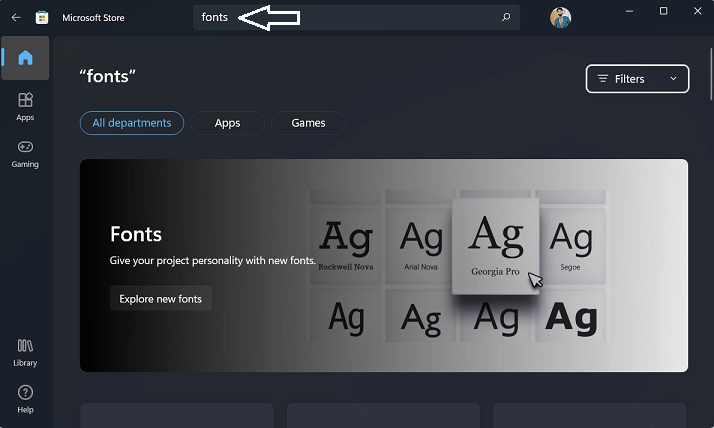
- Type fonts and click enter. Now you need to select your desired package from the list.
- Once you select your custom font style then click the get button.
- Now you need to install font style on your PC Windows.
- Once you complete the download process just click on open and proceed with the help of on-screen instructions.
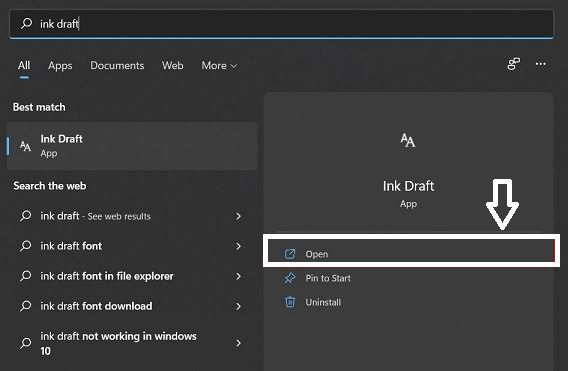
- After completing the installation process You could also access the newly installed font style from the start menu.
- That’s it. The custom fonts are installed in Windows 11.
Read Also: JW Library for PC
Install custom fonts using the TTF file:
I mentioned earlier, the Microsoft stores only have unique and restricted font styles. If you want more features and more custom style then you can use this method. However, this method has also a few security concerns. So follow these steps to install custom fonts using the TTF file.
- If you want to download a font file in the compressed format then make sure to extract it to a convenient location on your PC.
- Once you extract, make sure you get the TTF file.
- Now you need to apply the font and get the font style.
With these two different methods, you could get font style using the font preview menu or settings page.
Read Also: Zenmate for PC
Via fonts preview:
- First, you need to double-click the TTF file.
- Now you will get a preview window corresponding to the font style.
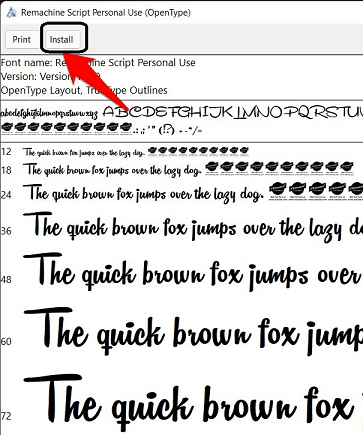
- Once you are satisfied with the style then click on the install button at the top.
- That’s it, the font style will show on your PC.
Via settings menu:
- Open the settings menu on your PC or you can use Windows + I shortcut key.
- Now you need to select personalization from the left menu bar and select the font section.
- Now you need to drag and drop the TTF file over the space provided to install it.
- Once you complete the above process then it will automatically install the font style on your PC.
These two methods are the best ways to install custom fonts in Windows 11.
Read Also: StarMaker for PC, Google Lens App for PC
How to uninstall custom fonts in Windows 11?
If you want to remove font style and want to uninstall custom font style in your Windows 11 then you can use these two methods. It will help you to uninstall custom fonts in your Windows 11.
Uninstall fonts via the settings menu:
- Just go to the settings menu in your Windows are you can use the Windows + X shortcut key.
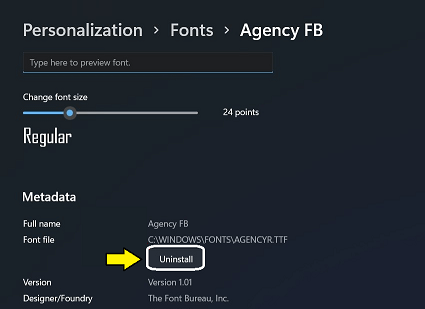
- Now you need to go to personalization and select the font option.
- Now you can select the font that you want to remove.
- That’s it. Just click the install button and the font will be removed from your PC
Uninstall fonts via the control panel:
- Open the control panel from the start menu.
- Just go to the fonts section.
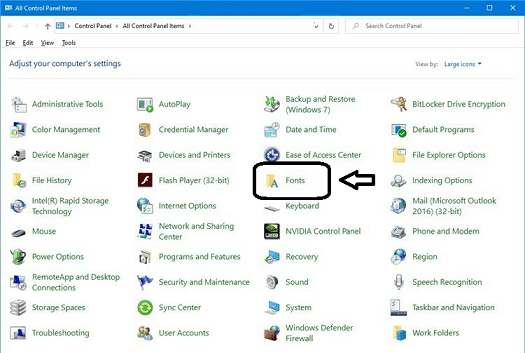
- Now you need to select the font that you want to remove.
- Just click delete in the top menu bar.
- That’s it. The font will be removed or uninstalled on your PC.
Read Also: Weather Channel on DirecTV
Conclusion:
I hope this guide helps to install custom fonts in Windows 11. We provide two different methods that really help to install and uninstall custom font styles in your Windows 11.
If you have any queries on how to install custom fonts in Windows 11 then feel free to ask Us using the comment box section. Keep in touch with us for more Tech updates.